Fetchers fetch logs from a remote location. You use built-in fetchers to retrieve logs from devices that do not send logs. You need to provide relevant parameters to configure the fetchers and use Test to check if the fetcher is working correctly.
Logpoint has the following built-in fetchers:
The Windows Management Instrumentation (WMI) Fetcher retrieves Windows device logs. Remember to enter the username and password of the Windows account when configuring the WMI Fetcher.
Configuring WMI Fetcher in Logpoint
Go to Settings >> Configuration from the navigation bar and click Devices.
Click the Add collectors/fetchers icon under Actions.
Click WMI Fetcher.
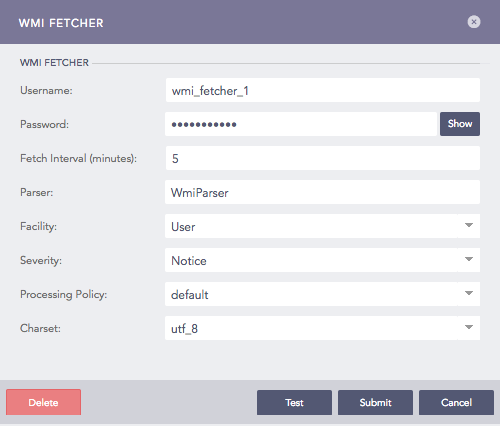
Configuring WMI Fetcher in Logpoint
Enter the Username and Password of Windows configured for the WMI service.
Warning
If the Windows user is in a domain, make sure that the username you enter is in the format domain/username (domain@username is invalid).
Enter the Fetch Interval in minutes.
Choose a Parser, a Facility, and a Severity.
Select a Processing Policy.
Choose an encoding format from Charset.
Click Submit.
Configuration of Windows system for WMI
Before using WMI, you need to configure Windows device settings. To configure:
Go to Control Panel >> Administrative Tools >> Components Services in Windows device.
On the Left panel of Components Services window, expand Component Services >> Computers.
Right-click My Computer and choose Properties.
Select COM Security.
Click Edit Limits in Launch and Activation Permissions.
Click Add.
Click Advanced.
Click Find Now.
Choose a user and click OK.
The user’s name is displayed in the name field in Select Users or Groups window.
Click OK.
Under Launch Permission, check Remote Launch and Remote Activation.
Click OK.
Configuration of Windows system for WMI with non admin rights
Follow the steps to configure a user with non-admin rights to forward windows logs into Logpoint using WMI service.
Create a new user from Administrative Tools >> Active Directory Users and Computers in Windows device.
Add users to the following groups.
Distributed COM users
Performance monitor users
Event log readers
Open WMI Control console.
3.1. Click Start.
3.2. Click Run.
3.3. Type wmimgmt.msc.
3.4. Click OK.
In the console tree, right-click WMI control and click Properties.
Click Security.
In the Security dialog box, click Add.
In Select Users, Computers, or Groups dialog box, enter the name of the object Performance monitor users. Use Advanced to query for objects.
In Security, under Permissions, select permissions. Add the following:
Remote Enable
Read Security
Assign the user to use Component Services.
Go to Component Services under Administrative Tools.
On the left panel of Components Services, expand Component Services/Computers.
Right-click My Computer and choose Properties.
Select COM Security.
Grant Access Permissions (Remote Access) and Launch and Activation Permissions (Remote Launch and Remote Activation) to the newly created user.
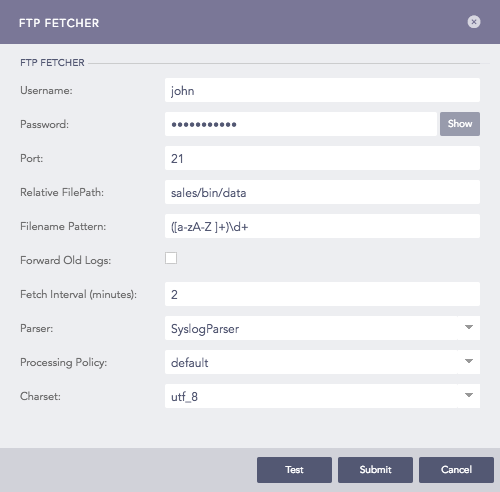
FTP Fetcher sets up an FTP client in Logpoint. After you configure an FTP client, you can retrieve log files hosted on remote FTP servers. Logpoint fetches all compressed log files. For plain text log files where new content is continually added, only the latest file is fetched.
Configuring FTP Fetcher in Logpoint
Go to Settings >> Configuration from the navigation bar and click Devices.
Click the Add collectors/fetchers icon under Actions.
Click FTP Fetcher.
Click ADD.
Configuring FTP Fetcher in Logpoint
Enter Username and Password.
Enter Port on which the FTP service is running. The default port is 21.
Enter the Relative FilePath and the Filename Pattern (in python regex). The pattern is matched against all the files beyond the provided file path. It determines the files from which the logs are to be fetched.
Select Forward Old Logs to forward old logs.
Enter the Fetch Interval in minutes.
Select a Parser, a Processing Policy, and a Charset.
Click Submit.
Configuring Filezilla server for FTP Fetcher
Go to Edit >> User.
Click ADD.
Create a password-protected account.
Click Shared folders.
Click Add to supplement the directory of the log files. Once you configure the root path, you can give the relative path to the root folder. Remember to give the Relative Path in the Logpoint as \home\user\log_file.log
Click OK.
SCP Fetcher fetches logs from the log files present in a remote host using the SSH connection. You must enable SFTP (SSH File Transfer Protocol) in the remote server to fetch logs using the SCP Fetcher.
Configuring SCP Fetcher in Logpoint
Go to Settings >> Configuration from the navigation bar and click Devices.
Click the Add collectors/fetchers icon under Actions.
Click SCP Fetcher.
Click Add.
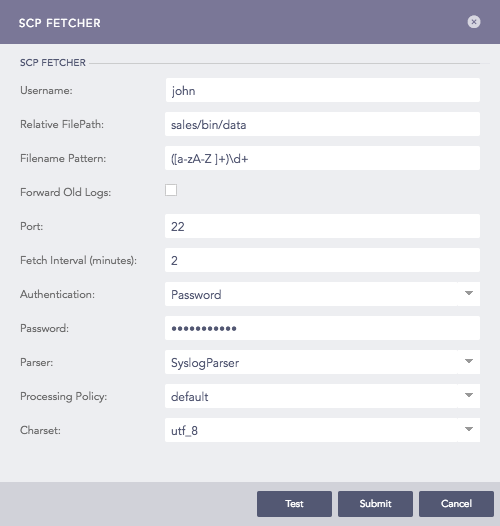
Configuring SCP Fetcher in Logpoint
Enter a Username for the fetcher.
Enter the Relative FilePath and the Filename Pattern (in python regex). The pattern is matched against all the files beyond the provided filepath. It determines the files from which the logs are to be fetched.
Select Forward Old Logs to forward old logs.
Enter the Port number used by the SCP service to listen to the remote server. The default SCP port is 22.
Use Fetch Interval to enter how often Logpoint should fetch files, in minutes.
Select a mode of Authentication: Password or SSH Certificate.
If you choose Password, you will need to enter or type what the password is.
If you choose SSH Certificate, Logpoint automatically generates a certificate key for you.
Copy the password or the SSH certificate key, as it is required later for the user validation.
Choose a Parser, a Processing Policy, and a Charset.
Click Submit.
SNMP Fetcher allows you to make SNMP queries to network devices to get the responses into the Logpoint. You can then use these responses as event logs for further analysis.
SNMP Fetcher needs SNMP Policy to make the SNMP Walk query. SNMP Policy is a set of OIDs and their query time intervals.
SNMP Fetcher makes an SNMPWALK query. The query uses SNMP GETNEXT requests to get the logs from a network entity. An object identifier (OID) is used while making this query. The OID specifies all the branches of OID tree for fetching. All variables in the sub-tree below the given OID are queried, and its values are presented to the user.
Before configuring SNMP Fetcher, you need to create SNMP Policy.
Creating an SNMP Policy
Go to Settings >> Configuration from the navigation bar and click Devices.
Click the Add collectors/fetchers icon under Actions.
Click SNMP FETCHER.
Click Policy.

SNMP Policy List
Click ADD.
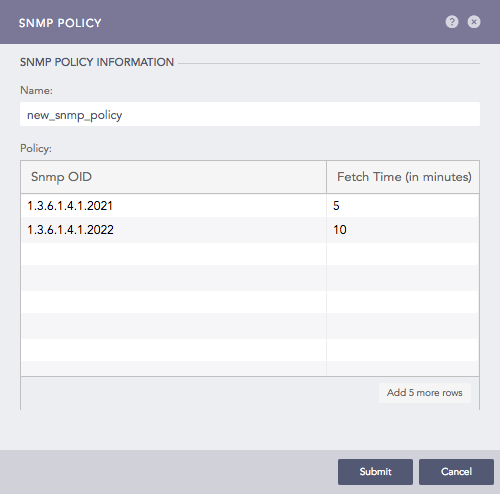
Addition of an SNMP Policy
Enter the Name of the policy.
Enter a list of OIDs and their respective Fetch times (in minutes).
Click Submit.
Configuring SNMP Fetcher in Logpoint
Go to Settings >> Configuration from the navigation bar and click Devices.
Click the Add collectors/fetchers icon under Actions.
Click SNMP Fetcher.
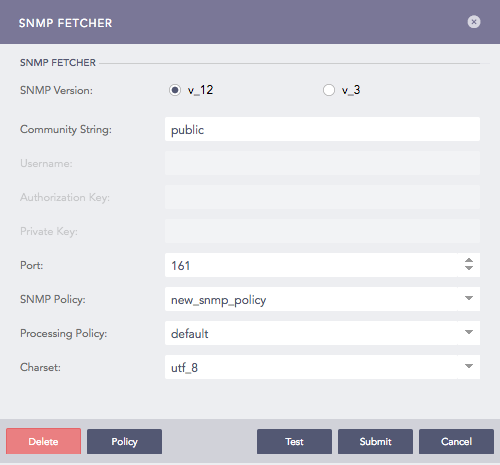
Configuring SNMP Fetcher in Logpoint
Choose an SNMP Version.
For Version1/Version2 (v_12) enter Community String.
For Version3 (v_3) enter Username, Authorization Key, and Private Key.
Specify the Port number.
Choose an SNMP Policy.
Note
You can also apply a policy from plugins.
Select a Processing Policy to apply over the logs.
Choose an encoding format from the Charset dropdown.
Click Submit.
Security Device Event Exchange (SDEE) is a network protocol used by security devices to communicate. You can forward network statistics from the SDEE devices into the Logpoint via the SDEE Fetcher.
Configuring SDEE Fetcher in Logpoint
Go to Settings >> Configuration from the navigation bar and click Devices.
Click the Add collectors/fetchers icon under Actions.
Click SDEE Fetcher and configure its essential parameters.
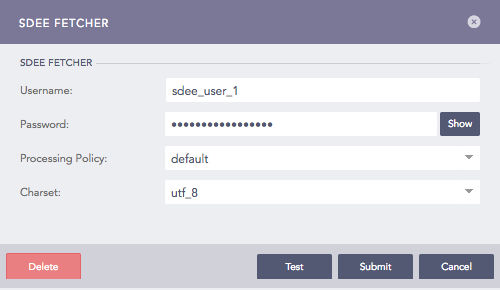
Configuring SDEE Fetcher in Logpoint
Enter Username and Password.
Select a Parser, a Processing Policy, and a Charset.
Click Submit.